Saturday, November 23, 2013

How to Make a Chain Scarf


It's time to get crafty! I'm not a huge fan of the winter season, but one thing I do look forward to is scarf season :) I own too many scarves to count and I never get sick of them. They're comfortable to wear and they can dress up even the simplest outfit.

If you're anything like me, you wear one almost every day. But buying them can get expensive. I mean, who wants to spend $15 on a piece of fabric? If you're thinking the same thing, you've come to the right place. In this video, you'll learn how to make a chain scarf (I am by no means a videographer, so my video isn't the best quality, but it works). You can make your scarf as thick or thin as you want. If you want it thicker, you just add more strands of yarn to your chain, and less for a thin scarf. I've posted pictures of some that I've made so far. You can see that they're different sizes and choose the one you prefer.


This is the simplest and cheapest scarf you'll ever make. It cost me a grand total of $2.99 to make this. And better yet, you don't need to have any extra tools. All you need to use is your fingers! Really, it doesn't get easier than this.

Here's what you need:
One skein of yarn (I used super bulky, 4 or 5 oz.)

If you're going to make your scarf thicker than one strand, I suggest unrolling the hole skein and putting the two ends together and keep folding the yarn until you get as many strands together as you want. It might seem a little overwhelming at first. but if you have someone hold one end it makes it easier. 


Tuesday, November 19, 2013

Oreo Parfait

Ok, I know I say this a lot, but this is most definitely the easiest recipe ever!

If you're looking for an incredibly simple and absolutely delicious dessert, this one is for you! I think you'll be pleasantly surprised at how good these are. Honestly, this took me less than 10 minutes to make. It's so easy that I didn't even take pictures of the process :)


Ingredients:
1 box of Oreo Pudding (I used Jell-O brand)
2 cups milk (or whatever is listed on the back of the pudding box)
5 Oreo cookies
1/2 cup cool whip

(Ingredient measurements are subject to change depending on how large you are making each serving. These measurements are for the size I used in the picture)

Prepare the pudding according to the back of the package. While the pudding is setting, crumble 4 of the Oreos (I just chopped mine up with a knife). After the pudding is set up, begin assembling. Start with the pudding in the bottom, followed by a sprinkle of the crumbled cookies, and then some cool whip. Continue this pattern until you reach the top of the cup. Top with more cool whip and an Oreo. Enjoy!
Follow my blog with Bloglovin

French Onion Soup

Here is the second outcome of my day without work :) French onion soup for dinner!

This recipe is delicious. And not only that, but it's easy to make and will leave you with leftovers. I know sometimes when you hear the word leftovers it sounds disgusting, but the good thing about soup is it gets better over time. I actually made my soup in the afternoon so that it was able to sit for a few hours and then we heated it up for dinner. 

As you may have seen in other recipes, I don't like to spend a lot of money on food. So I find ways to substitute some of the cheaper stuff for the expensive ingredients without ruining the flavor. For this recipe, I used a mix of onions to add some different flavors (and yellow or sweet onions are a lot cheaper than white onions so I use more yellow onions). Also, instead of buying Gruyère cheese, I used a mix of white cheddar, mozzarella, and parmesan on top. 

One other good thing about this recipe is that you can multitask while you're making it :) In fact, I made my Rueben Sandwiches while I was cooking the soup. So basically what I'm saying is you have no excuse for not trying this recipe :)


Ingredients:
2 tablespoons unsalted butter
2 1/2 pounds yellow onions, thinly sliced
1 tablespoon all-purpose flour
1 cup dry white wine
8 cups beef stock
2 teaspoons fresh thyme, minced (or 3/4 teaspoon dried)
1 bay leaf
Kosher salt and freshly ground pepper
1 crusty baguette
2 2/3 cups shredded Gruyère cheese (I used a combination of different cheese)


In a large, heavy sauté pan, melt the butter over medium heat. Add the onions, stir well, cover, and cook for 5 minutes. 

Uncover, reduce the heat to medium-low, and cook, stirring occasionally until tender and deep golden brown, about 30 minutes. Sprinkle the flour over the onions and stir until combined. 

Gradually stir in the wine, then the stock, and finally the thyme and bay leaf. Bring to a boil over high heat, reduce the heat to medium-low, and simmer, uncovered, until slightly reduced, about 30 minutes. Season with salt and pepper. Discard the bay leaf.

Meanwhile, preheat the broiler. Have ready some soup crocks (make sure they're able 
to go in the oven). Cut the baguette into slices so that 2 will fit inside each crock 
(you can toast the slices in the oven if you'd like).

Ladle the hot soup into the crocks. Place 2 bread slices, overlapping if necessary, on top of the soup. 

Sprinkle each crock evenly with about 1/3 cup of the cheese. 

Broil until the cheese is bubbling, about 2 minutes. Serve and enjoy!


Inspired by Comfort Cooking by Rick Rodgers.


Monday, November 18, 2013

Reuben Sandwich

No work for me today!! That means a day spent cooking :) What could be better?

My dad didn't work today either, so I decided to make us lunch and plan something for dinner. Today for lunch we had Reuben Sandwiches. They hit the spot! (and for dinner we're having homemade French Onion Soup...that recipe will be coming next)

Since my great grandparents are Polish, I've grown up eating sauerkraut. I absolutely love it! I like it plain, with Polish Sausage, and on sandwiches...obviously. The more sauerkraut the better. If you've tried it before and you don't think you like it, I encourage you to try it on these sandwiches. Trust me, it's delicious.

So here you have it...quick and easy Reuben Sandwiches.


Ingredients:
4 slices rye bread
1/4 cup Thousand Island dressing
1/2 lb corned beef sliced
1 cup sauerkraut, drained (I used more because we love sauerkraut)
4 slices swiss cheese
Butter to spread on bread slices


Preheat a griddle or 2 large frying pans over medium heat. Heat the corned beef in a pan, just until heated but not browned. Lay the bread slices on a work surface and butter each slice of bread. 
Spread dressing on two slices. 


Add the corned beef on top of the dressing. 


Pile sauerkraut on top of the corned beef. 


Next add two slices of cheese to each sandwich.


Top with remaining piece of bread and place on the hot griddle or frying pan. Cook until golden brown on the bottoms. The sandwiches should cook slowly to allow the bread to brown without burning while the cheese melts. Transfer to a cutting board and cut in half. Serve hot.

Enjoy!


Inspired by Comfort Food by Rick Rodgers


Sunday, November 17, 2013

Coffee Cake


I'm a little late on posting this week because I've been out deer hunting :) Here's a picture of one of the bucks my dad and I got.


So I was gone a few days and once I got back home I was itching to bake. I decided to try something out of one of the new cookbooks I got last week, so here it is...a streusel coffee cake. It's good for a sweet breakfast, or even for dessert. I love how it's crispy on the outside and moist on the inside. I probably should have left mine in the oven a little longer, but I was excited to try it so I took it out a little early :)

p.s. I didn't have my nice camera while I was baking so I didn't get any good pictures of the process, but I got a few of the final outcome.


Ingredients:
1/2  cup butter, softened
1 (8 oz.) package of cream cheese, softened
1 1/4 cups sugar
2 large eggs
2 cups all-purpose flour
2 teaspoons baking powder
1/2 teaspoon baking soda
1/2 teaspoon salt
1/2 cup milk
1 teaspoon vanilla extract
1/2 teaspoon almond extract
Crumb Topping (recipe following)

1. Preheat oven to 350 degrees. Beat butter and cream cheese at medium speed with an electric mixer until creamy. Gradually add sugar, beating at medium speed until light and fluffy. Add eggs, one at a time, beating just until yellow disappears.
2. Sift together flour, and next 3 ingredients; add to butter mixture alternately with milk, beginning and ending with flour mixture. Beat at low speed just until blended after each addition. Stir in vanilla and almond extracts. Pour batter into a greased 13 x 9 inch pan; sprinkle with Crumb Topping.
3. Bake at 350 degrees for 35 to 40 minutes or until a toothpick inserted in the center comes out clean. Let cool for 20 minutes before serving.

Crumb Topping:
1/2 cup all-purpose flour
1/2 cup sugar
1/2 cup coarsely chopped pecans
1/4 cup butter, softened

Stir together flour, sugar, and pecans in a bowl. Cut in butter with a pastry blender or fork until mixture resembles small peas.

Enjoy!


Inspired by Southern Living Home Cooking Basics

Tuesday, November 12, 2013

Peanut Butter Bars

Simply Sweet is living up to it's name here! These things are definitely sweet, and definitely good! But let me warn you, you might want to have a glass of milk nearby :)

Who doesn't love peanut butter? And what goes better with peanut butter than chocolate...I mean, really? I don't have much to say about these things other than you should try them! Trust me, they're good.


Ingredients:
1/2 cup margarine or butter
1 cup peanut butter
3 1/2 cups powdered sugar (sometimes a little more, sometimes a little less)
1 cup chocolate chips

Directions:

Place the chocolate chips in a double boiler and begin to melt. 

Combine the butter and peanut butter in a pot and melt together. Once the peanut butter and butter are melted, add the powdered sugar a little at a time (Each recipe will require a different amount of powdered sugar. You just want to add enough so that it's firm and can be pressed into the bottom of a pan. If you add too much sugar it will take away from the peanut butter taste). 

Press the peanut butter mixture in the bottom of an 8x8 pan. 
(I used a bigger pan because I like mine thinner). 

Spread the melted chocolate chips over the top. 

Put in the refrigerator or freezer for a few hours or overnight (You want the bars to come out clean. 
I like leaving them in the freezer overnight and eating them cold).

Enjoy!!

Monday, November 11, 2013

Jambalaya

I decided to get a little adventurous with my blogging, and made something I've never made before. And it was a hit!

It's always fun to try a new recipe. Especially when it's a southern dish :) My first time making Jambalaya was a success! And I wanted to share it with you guys because if I can make it, then you can too! (Don't let the list of ingredients scare you!! I know it looks like a lot but it's mainly vegetables and spices)

One good thing about Jambalaya is it gets better over time, which is great for this recipe because it makes a ton! So unless you're feeding an army (or a house full of boys), you'll most likely have some leftovers. Not only that, but if you see something that you don't like, you can easily substitute something else in its place. I'll confess to you the things that I substituted (or left out)...most of it was on accident. 

I started preparing and chopping everything, and as I went down the list I got to tomatoes. So I went to get a tomato out of the refrigerator...and it wasn't there. At first I panicked a little bit (how can you not put tomatoes in Jambalaya?!) but I didn't have a choice so I had to leave them out. Also, you'll see there is no green pepper in my pictures. That's because all we had was yellow and orange. And since regular shrimp are too expensive for me :) I just used salad shrimp (they're smaller and about half the price). I also didn't want to spend the money to buy fresh herbs, so I just used dry herbs in smaller amounts. 

I learned my lesson...next time I'm going to try a new recipe, I need to make sure I have all of the ingredients (I'm a total rule-follower when it comes to cooking and baking). Thankfully it didn't matter with this recipe because it still tasted AMAZING despite my lack of observation. So there, you have proof that substituting (or leaving out) is ok with this recipe. (I'm only talking about the small things though. Obviously you can't leave out the stock or the rice)

I hope you're feeling as adventurous as I was and try this recipe. I think you'll love it!

Enjoy!


Ingredients:
1 tablespoon olive oil
1 pound sausage, such as kielbasa or andouille, sliced
1 pound smoked ham, cubed
1 tablespoon butter
1 medium onion, diced
1 cup diced celery
1 green bell pepper, cored and diced
1 red bell pepper, cored and diced
1 cup seeded and diced tomato
3 garlic cloves, minced
1 jalapeño pepper, seeded and minced OR 1/2 teaspoon cayenne
2 teaspoons diced fresh oregano
1 teaspoon diced fresh thyme
2 tablespoons tomato paste
6 cups chicken stock, preferably homemade
3 cups long-grain rice, rinsed
3 bay leaves
2 teaspoons kosher salt
1 teaspoon freshly ground black pepper
6 to 8 dashes hot sauce, optional
1/2 cup chopped scallions, divided
3/4 cup chopped fresh parsley, dived
1/4 cup freshly squeezed lemon juice
1 pound medium shrimp, deveined (20 to 24 count)

Heat the oil in a large Dutch oven or black iron pot over medium heat. Add the sausage and saute for 8 to ten minutes, until browned. Remove the sausage to a bowl, and set aside. 

Add the ham to the same pot and cook 8 to 10 minutes, until lightly browned. Remove to the bowl with the sausage and set aside. 

Add the butter, onion, celery and peppers to the same pot and saute for 8 to 10 minutes, until the onion is translucent. Add the tomato, garlic, jalapeño or cayenne, oregano, thyme, and tomato paste and cook until all the vegetables and herbs are blended well. 

Add the stock and bring to a rolling boil. Stir in the rice, and add the sausage, ham, bay leaves, salt, pepper and hot sauce. Return to a boil, reduce the heat to low and simmer, covered, for 20 minutes. Add 1/4 cup of the scallions, 1/4 cup of the parsley, the lemon juice, and the shrimp, and stir well. Cover the pot, remove it from the heat and allow the jambalaya to steam, for 15 minutes, before serving.

Garnish with remaining 1/4 cup scallions and 1/2 cup parsley, and add a dash of hot sauce, if desired.

Inspired by Ina Garten

Saturday, November 9, 2013

Apricot Oat Bars

This morning I woke up and was so excited for what I was planning to make. It's one of my favorite recipes and I was looking forward to sharing it. So I get in the kitchen, put everything together and put it in the oven to bake. I took it out of the oven and was so excited to try it (it's always better when it's warm)! I take the first bite...and let's just say it didn't turn out like it was supposed to. So I gave up on that recipe and turned to Plan B, which is another one of my favorites!

Apricot Oat Bars is a fairly new recipe to me. The first time I tried them my family went crazy! They're so good! And they're pretty healthy for a dessert (yes, we eat them as dessert, that's how good these things are). They're the perfect treat to take to bake sales, dinners, or parties...or to just keep to yourself ;) 

Whenever I make these I usually don't tell people what's in them at first, because once I say apricot they usually pass. So I make them try it, they fall in love, and they're shocked when I tell them it's apricot. Believe me, you'll love these! I hope you try them!

Enjoy!


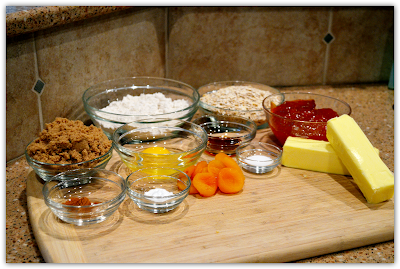
Ingredients:

Cooking Spray

For the filling:
1 (13-ounce) jar apricot preserves
8 dried apricots, chopped into 1/4-inch pieces (I use more because I love apricots)

For the crust:
1 3/4 cups all-purpose flour (I used gluten-free flour)
1 cup packed light brown sugar
1 teaspoon ground cinnamon
3/4 teaspoon fine sea salt
3/4 teaspoon baking soda
1 3/4 cups old-fashioned oats
1 cup (2 sticks) unsalted butter, melted
1 egg, at room temperature, beaten
1 teaspoon pure vanilla extract


Directions:
Put an oven rack in the center of the oven. Preheat the oven to 350 degrees F. Line the bottom and sides of a 9x13x2-inch metal baking dish with parchment paper. Spray the parchment paper with cooking spray and set aside.


In a small bowl, mix together the apricots and the apricot preserves 
(I like to stir this a little bit just to loosen the preserves. This makes it easier to spread)

In a large bowl, whisk together the flour, sugar, cinnamon, salt, and baking soda. Stir in the oats.


Add the butter, egg, and vanilla and stir until incorporated.

Using a fork or your fingers, lightly press half of the crust mixture onto the bottom of the pan. 

Using a spatula, spread the filling over the crust, getting close to the edge off the crust but not all the way. 

Sprinkle the remaining crust mixture over the filling. Bake until lightly golden, about 30 to 35 minutes. Cool for 1 hour. 

Cut into bars and store in an airtight container.
(I like to put mine in the refrigerator and eat them cold)


P.S. I made these gluten-free by just replacing the flour. If you don't need to eat gluten-free just use regular flour.

This is the gluten-free flour that I use.

Inspired by Giada De Laurentiis

Thursday, November 7, 2013

Jalapeño Poppers

Here it is! My first post :) Exciting!

The first thing I decided to make was Jalapeño Poppers. They're SO simple, very cheap, and extremely tasty! What more could you ask for, right? And to make them even better, they're spicy. 


But don't let that scare you! When you're cooking with jalapeños you can make them as spicy (or not spicy) as you want. Here's what you do, when you slice a jalapeño in half you'll see the seeds and the membrane. If you don't want it spicy, you'll want to take all of that out and just leave the shell of the pepper. Depending on how spicy you want it will determine how much of the inside you take out. (You didn't know you were going to get a lesson on jalapeños did you?)


When handling jalapeños, you may want to wear gloves. Hands should not come in contact with eyes as this may cause burning. 


Trust me, if you're not a fan of spicy foods you should still try these. Really! My sister hates spicy food, and she loved these! Don't be afraid, just try them. I promise you'll like them!


Jalapeño Poppers

Ingredients:
1 tube Crescent Rolls
1 8 oz Cream Cheese
3 Jalapeños
5 slices of Bacon (cooked)

Directions:
Preheat oven to 375 degrees. 


Chop the jalapeños and bacon into small pieces. 


Unroll the crescent rolls and place them on a greased baking sheet. Cut cream cheese into about 1-inch squares and place one square on each roll. Sprinkle jalapeños and bacon onto the cream cheese (put as much in each one as you'd like, there's no rule for this). 


Wrap the crescent roll around the filling so that they are in the shape of a ball. 


Bake in the oven for 13 minutes or until golden brown and cheese is melted. 
Makes 8 Jalapeño Poppers


That's it! How simple is that?! And tasty!


Inspiration from New York Foody